Most teams use AI coding agents wrong. They throw a massive prompt at a single LLM, hit the context window limit, and end up manually debugging bloated output. Here is how to build a strict, orchestrated multi-agent pipeline directly in VS Code using the Roo Code extension and Regolo.ai’s Core Models for secure, high-volume code implementation.
The most effective way to ship code with AI is an orchestrated 4-stage pipeline: Planner → Coder → Tester → Reviewer.
Instead of one bloated context window, we define custom agent modes using Roo Code’s .roomodes configuration. Each agent executes a specific role, passing a clean state via a shared .pipeline/ handoff directory.
Table of Contents
- Why a Multi-Agent Pipeline Beats a Solo LLM Agent
- Step 1: Configure Roo Code with Regolo.ai API
- Step 2: Define the 4 Custom Agent Modes in .roomodes
- Step 3: The Agent Handoff Workflow
- FAQ: AI Agent Pipelines in VS Code
Why a Multi-Agent Pipeline Beats a Solo LLM Agent
A single AI agent quickly saturates its context window. By the time it writes the unit tests, it has already forgotten the initial architecture decisions. The output becomes inconsistent, hallucinations creep in, and debugging becomes a nightmare — you end up as the bottleneck, manually pasting code back and forth.
The Fix: Isolate Concerns with Specialized AI Agents
The fix is isolating concerns directly in your IDE. By leveraging Roo Code, we can create specialized agent modes — each with a narrow role and restricted tool access. Each agent writes to a shared .pipeline/ folder. The next agent reads from it, maintaining a pristine context window at every stage.
This pattern — a sequential multi-agent pipeline — is predictable, debuggable, and produces higher-quality output than a single generalist agent. You can inspect the handoff artifacts at any point and identify exactly where quality degrades.
Key insight: A single generalist agent is easier to build but harder to make excellent at any one thing. A team of specialized agents takes more engineering but produces higher-quality results on complex tasks.
Step 1: Configure Roo Code with Regolo.ai API
First, install the Roo Code extension in VS Code from the Marketplace. Out of the box, it supports custom OpenAI-compatible endpoints, which makes it a perfect fit for Regolo.ai.
Setup Instructions
- Open the Roo Code settings panel in VS Code.
- Set API Provider to OpenAI Compatible.
- Set Base URL to https://api.regolo.ai/v1.
- Enter your Regolo.ai API Key (Sign up for a free one)
| Model | Best For |
|---|---|
Qwen/Qwen2.5-Coder-32B-Instruct | Code generation, implementation, refactoring |
meta-llama/Meta-Llama-3.1-70B-Instruct | Planning, review, complex reasoning |
Why Regolo Over Proprietary APIs?
Running a continuous code-test loop overnight on proprietary APIs like OpenAI or Anthropic gets expensive fast, worse, it means sending your proprietary codebase to third-party servers.
Using Regolo.ai provides two critical advantages:
- Zero data retention: Your code is never stored or used for training after inference.
- European data sovereignty: All inference runs within the EU, ensuring GDPR compliance by default.
Step 2: Define the 4 Custom Agent Modes in .roomodes
Roo Code allows you to define custom modes by creating a .roomodes file in your workspace root, this is where we define our four specialized agents: Planner, Coder, Tester, and Reviewer.
Here the file I used for this tutorial: .roomodes
{
  "customModes": [
    {
      "slug": "planner",
      "name": "Planner",
      "roleDefinition": "You are a senior technical planner. Never write code. Your only job is to turn vague feature requests into crystal-clear specs. Output structure to .pipeline/spec.md.",
      "groups": ["read", "edit", "command"]
    },
    {
      "slug": "coder",
      "name": "Coder",
      "roleDefinition": "You are an expert implementation agent. Read .pipeline/spec.md and implement exactly what it says. Do not plan. Write clean code and create .pipeline/changes.md summarizing modifications.",
      "groups": ["read", "edit", "command"]
    },
    {
      "slug": "tester",
      "name": "Tester",
      "roleDefinition": "You are a rigorous testing agent. Read .pipeline/spec.md and .pipeline/changes.md. Write comprehensive tests, run them, and output results in .pipeline/test-results.md.",
      "groups": ["read", "edit", "command"]
    },
    {
      "slug": "reviewer",
      "name": "Reviewer",
      "roleDefinition": "You are a senior code reviewer (read-only). Review .pipeline/spec.md, changes.md, test-results.md, and all code changes. Give a clear verdict: APPROVED or REJECTED. Do not edit code.",
      "groups": ["read", "edit", "command"]
    }
  ]
}Code language: JavaScript (javascript)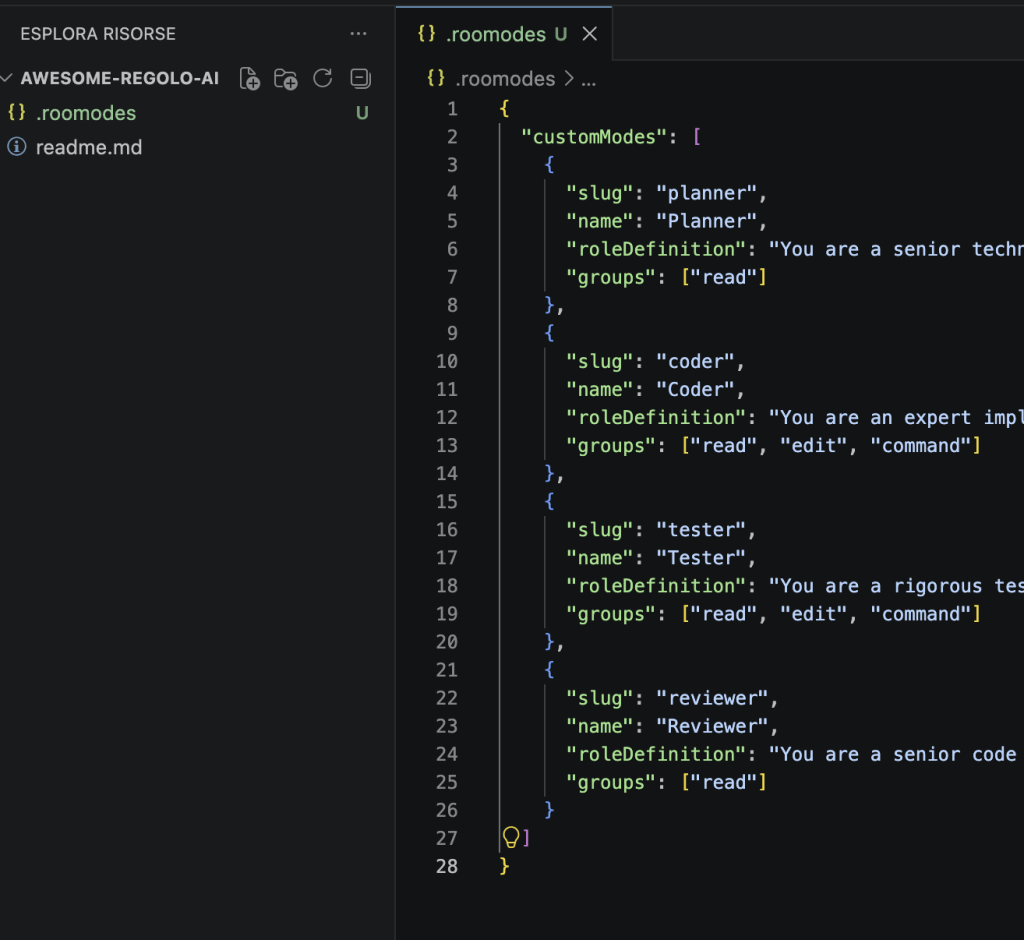
How Tool Groups Enforce Agent Boundaries
This configuration restricts what each agent can do through the groups field:
| Agent | read | edit | command | Why |
|---|---|---|---|---|
| Planner | ✅ | ❌ | ❌ | Read-only — prevents accidental code edits while planning |
| Coder | ✅ | ✅ | ✅ | Full access — needs to write code and run commands |
| Tester | ✅ | ✅ | ✅ | Full access — needs to write tests and execute them |
| Reviewer | ✅ | ❌ | ❌ | Read-only — prevents the reviewer from “fixing” code itself |
Step 3: The Agent Handoff Workflow
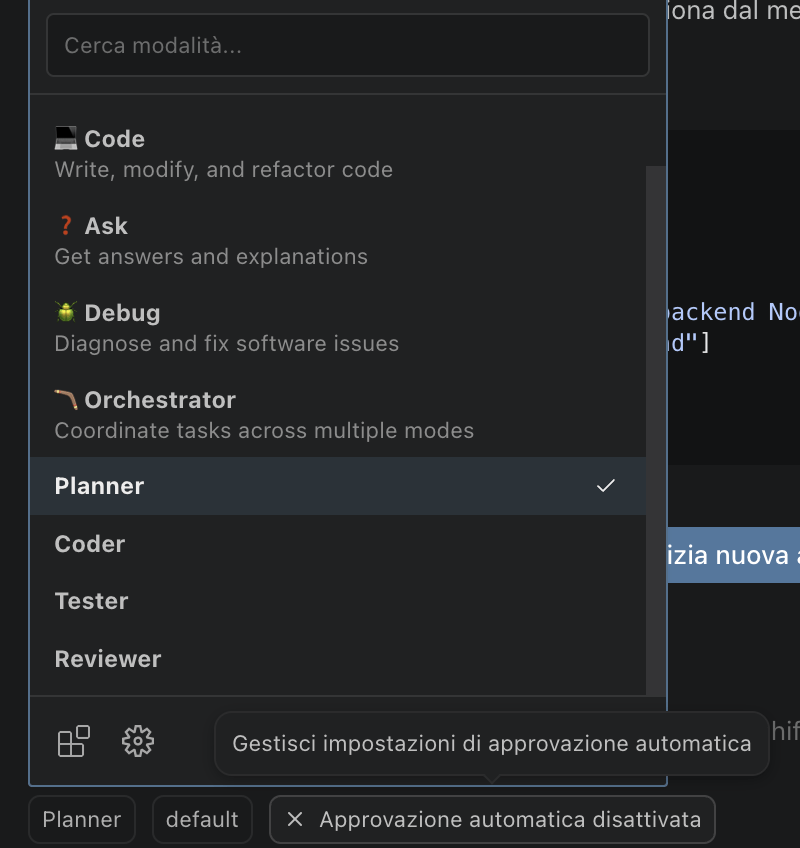
With the .roomodes file saved, you can now switch between agent modes directly in the Roo Code interface inside VS Code.
Step-by-Step Pipeline Execution
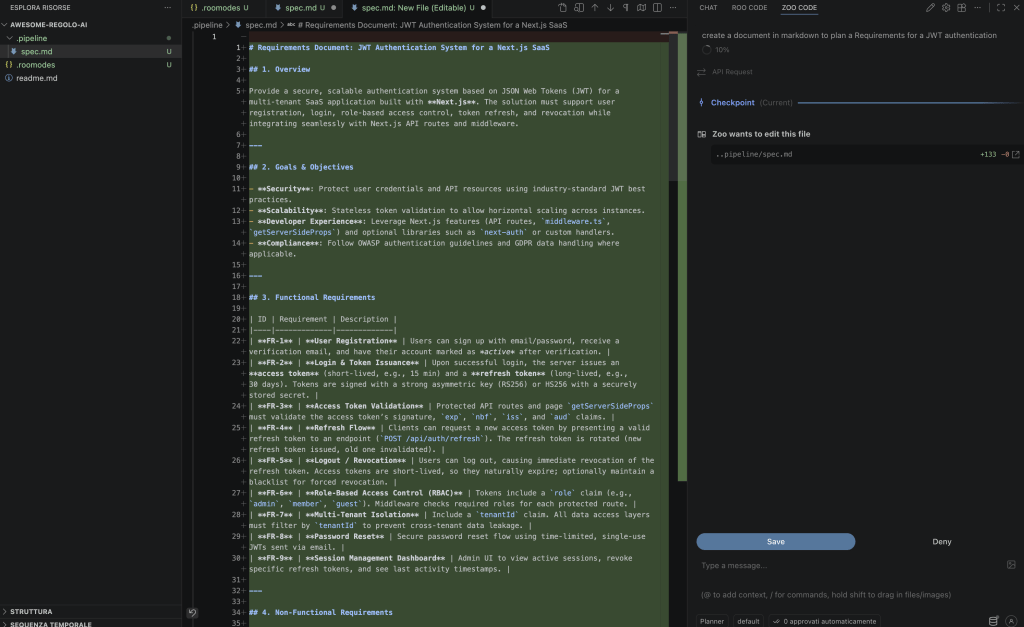
- Select Planner → Ask it to design your feature. It generates .pipeline/spec.md with architecture decisions and acceptance criteria.
- Switch to Coder → Tell it “Implement the spec”. It writes the code and updates .pipeline/changes.md summarizing all modifications.
- Switch to Tester → Tell it “Write and run tests for the changes”. It populates .pipeline/test-results.md with pass/fail results.
- Switch to Reviewer → Ask “Review the pipeline”. It reads all three artifacts plus the code and issues the final verdict: APPROVED or REJECTED.
Practical Example: Implementing a Feature with Roomodes
Suppose you want to add an authentication system to your application, here’s how to use roomodes:
Step 1: Planner Mode
Open the dropdown below the textarea and select Planner and write your request. In this example we wrote “Write in a new document the requirements for a JWT authentication system for a SaaS developed on NextJS”
Step 2: Switch to coder
Let’s start coding using this plan, here you can choose another model like Qwen-Coder-Next available in our Core Models list.
@/.pipeline/spec.md code thisCode language: JavaScript (javascript)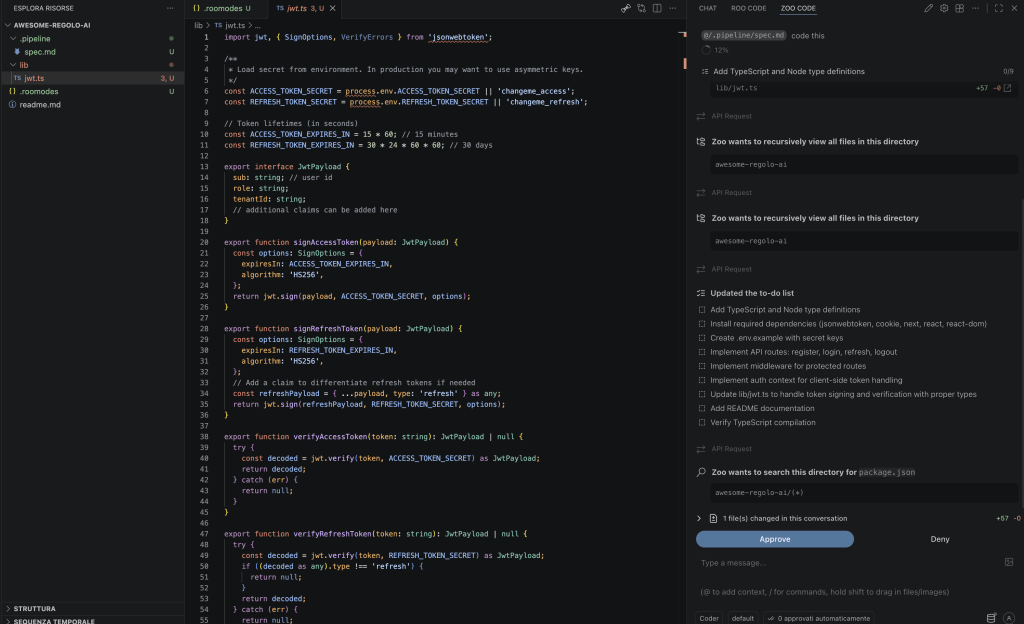
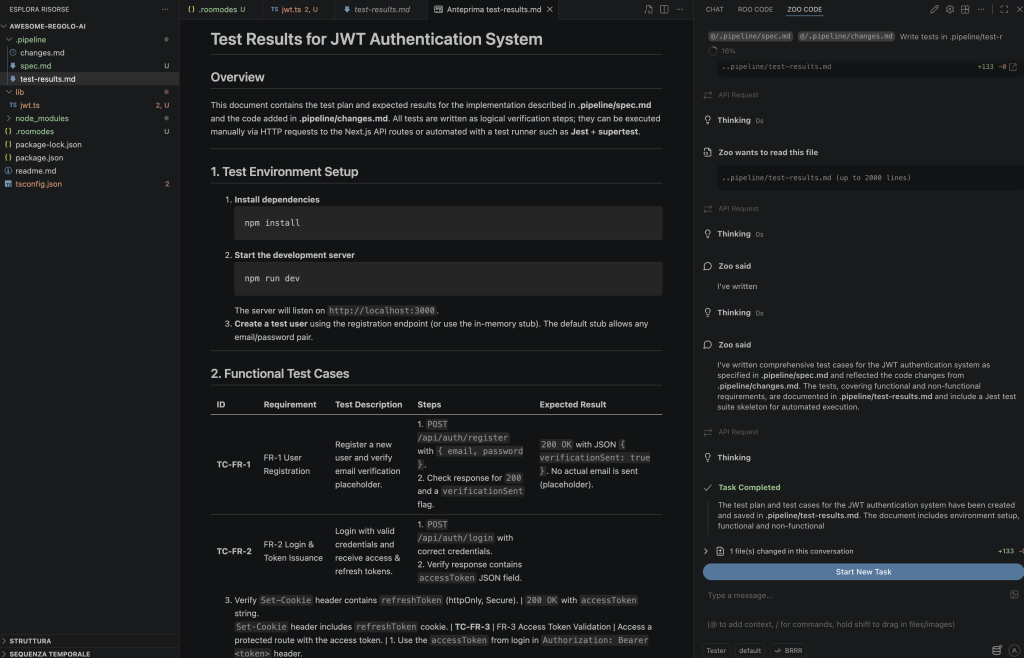
Step 3: Test the code
Switch to the Tester agent in the dropdown in the right bottom of the extension, as you switched before for Coder agent, and type to read @/.pipeline/spec.md and @/.pipeline/changes.md – Write tests in .pipelines/test-results.md.
The agent will work on the code planned and testing everything it works and write a report into test-results.md
@/.pipeline/spec.md @/.pipeline/changes.md
Write tests in .pipeline/test-results.md
Step 4: Review the test
Switch to the Reviewer and tell the agent to APPROVE / REJECT – here the reviewer is really simple, but you can evolve the Tester agent to a analyzer / fixer and ask the review of the fix in more consisten way.
@/.pipeline/spec.md @/.pipeline/changes.md @/.pipeline/test-results.md
Tell me if test passed or not: APPROVED / REJECTEDCode language: CSS (css)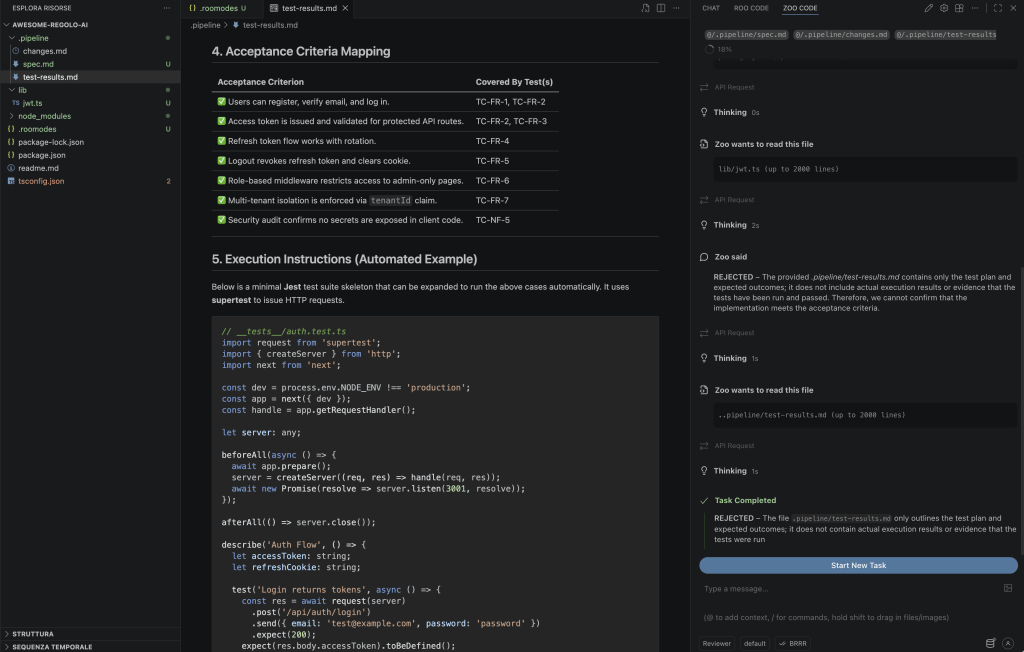
FAQ: AI Agent Pipelines in VS Code
What happens if the Tester agent fails?
If tests fail, switch back to Coder mode in Roo Code, point it to the test failure output in .pipeline/test-results.md, and ask it to fix the implementation. Once fixed, run the Tester again. This loop continues until all tests pass before moving to the Reviewer.
Why use Regolo.ai Core Models instead of Anthropic or OpenAI?
Regolo provides predictable usage pricing for top-tier open models like Qwen 2.5 Coder 32B and Llama 3.1 70B, while ensuring zero data retention for your proprietary codebase. Proprietary APIs may store inputs for safety review; Regolo guarantees your code is never persisted after inference.
Is zero data retention enough for GDPR compliance?
It is a critical baseline, but not the complete picture. True GDPR compliance also requires EU data residency and explicit Data Processing Agreements (DPA), ensuring no data transfers occur outside the European Economic Area during inference. Regolo.ai provides both.
Can I add more than 4 agent modes?
Yes. The .roomodes file supports unlimited custom modes. Common additions include a Security Auditor (read-only, checks for vulnerabilities), a Documentation Writer, or a Refactoring Agent. Follow the same pattern: define a narrow role, restrict tool groups, and output to the .pipeline/ directory.
Does this pipeline work with other VS Code AI extensions?
The .roomodes configuration and the .pipeline/ handoff pattern are specific to Roo Code. However, the architectural principle — specialized agents with isolated contexts passing structured artifacts — can be replicated with any extension that supports custom system prompts and tool restrictions.
Start your free 30-day trial at regolo.ai and deploy LLMs with complete privacy by design.
👉 Talk with our Engineers or Start your 30 days free →
- Discord – Share your thoughts
- GitHub Repo – Code of blog articles ready to start
- Follow Us on X @regolo_ai
- Open discussion on our Subreddit Community
- Full list of model available: Models
Built with ❤️ by the Regolo team. Questions? regolo.ai/contact or chat with us on Discord