If you are interested in creating agents with AI to simplify your daily routine, chances are you came across the concept of n8n workflow. But what is n8n? What kind of workflows can you create with it? If you are interested in these concepts, we want you to know that we are too! And are happy to share our experience in creating an n8n workflow based on the models we provide you through regolo.ai/.
What is n8n?
It is a service that allows you to create workflows using AI in lot of contexts. It is useful in both work and daily life.
Prerequisites
As happened in previous tutorials, we need to have a docker installation on our PC.
Please refer to the Docker official documentation to install it:
Installing n8n on your machine
To install n8n, we’ll use Docker, by typing the following commands to create a volume for n8n and run it:
docker volume create n8n_data

docker run -it --rm --name n8n -p 5678:5678 -v n8n_data:/home/node/.n8n docker.n8n.io/n8nio/n8nCode language: Bash (bash)
First login
While your n8n Docker container is running, you’ll be able to access n8n on http://localhost:5678.
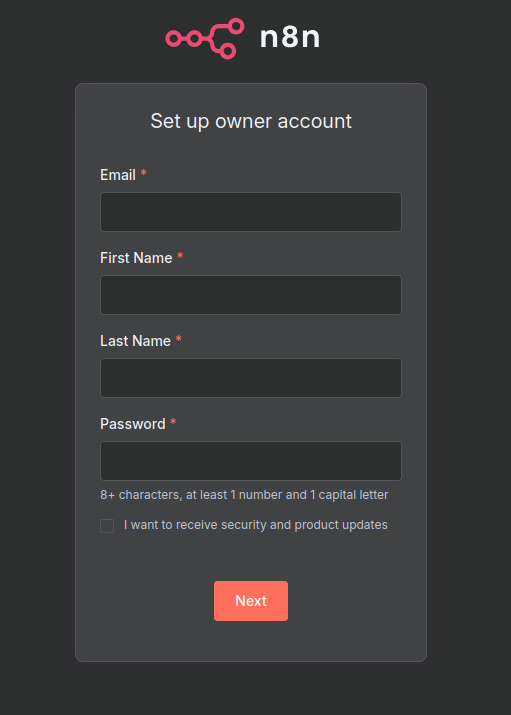
The first time you open it, you’ll get a form like the one you see in this image. You’ll have to input your data in order to create an owner account to handle your workflows.
After filling this form, you’ll be asked to input info about why you are using n8n. After completing that form too, you’ll be asked if you want to get a free license key for the community edition: if you want it, just input your mail and it will be sent to you.
Creating a workflow
To create a new workflow, just click on Create Workflow on top left of the screen.
After doing that, you’ll find yourself into the new workflow.
First step
Let’s start by adding the first step: since we want our workflow to run on regular intervals, it’ll be a step “On a schedule”, if you prefer to run it in a different way, you can do it by selecting a different kind of trigger.
Second step
To add the second step, press the + button and search for gmail, then select get many messages.
In the step configuration, add a credential on the Credential to connect with menu.
If you don’t have a credential, you’ll be redirected in the Gmail account menu, there you can see the docs under Setup guide on the right to add a gmail credential.
Simply explained, you’ll have to log into your Google Cloud Console and create a project for your n8n. You’ll need to enable the Gmail API and setup the authentication. Then you’ll need to add the OAuth for your application, following the prompted steps. Add the n8n OAuth Redirect URL to the project’s Authorized redirect URLs. Once you do that, you’ll get the Client ID and Client secret to add to n8n.
Remember to add your own mail to the Test users in order to be allowed to login properly!
After having added your google login to the step, you can decide how many mails you want to be read, and integrate advanced configurations and filters to gain better control of the mail reading.
Third step
For the third step, we want to structure our mails in a way that can be easily sent to an AI agent: we press on + and search for aggregate: in the parameters of the step, it is needed to insert snippet in the Input Field Name field.
Fourth step
The fourth step is the AI agent, once we add it, we are allowed to change the Source for Prompt (User Message) parameter to Define below. Then we can write a prompt like: “Please summarize this email snippet: {{ $json.snippet }}”.
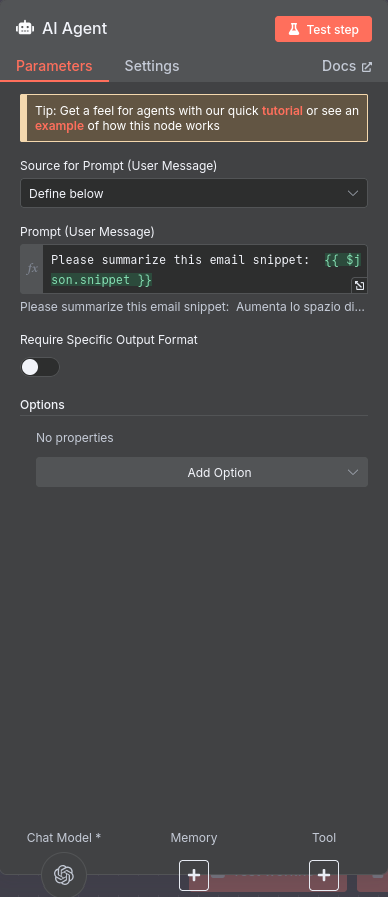
Once the configuration of the step itself is finished, we need to add a Chat Model by pressing on the bottom left of the AI agent popup. Here we add a model based on OpenAI, in its credential you can add the Base URL of regolo.ai/: "https://api.regolo.ai/v1” and your API Key (refer to our docs to get your API Key). Then you can choose the text model you want to use, my advice is using a lighter model like Llama 3.1 8B Instruct for simple tasks like this one, but you can choose what is best for your use case.
Fifth step
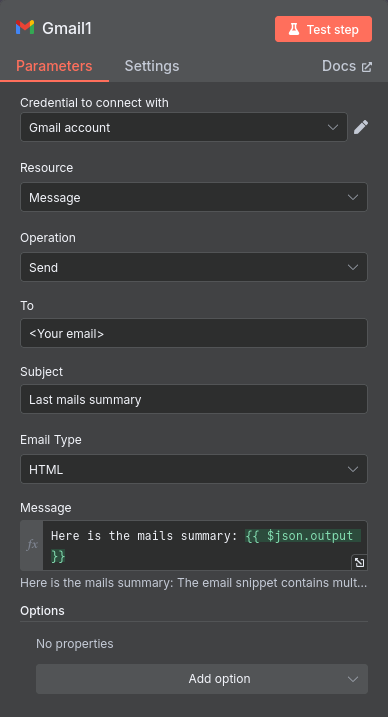
For our last step, we can email the summary to our mail, or any other mail to which we want to send the outputs of our AI model.
Fill in the parameters like in the image, specifying the structure and the recipient of the email with the summary, then you can test your workflow and see if it works correctly.
Conclusion
We hope to see you experimenting with how it is possible to use can use AI in real world applications.
If you have had any problems in using Regolo in this context, feel free to contact us, sending us an e-mail, joining our Discord community or leaving a comment on this post.