Prototyping AI agents usually means writing endless Python glue code or getting locked into proprietary platforms where you can’t see the prompts, control the data, or swap the model.
CTOs and developers need a middle ground: the speed of a drag-and-drop builder, but the power to use any model (including open weights) and the freedom to host the inference where the data laws are respected (Europe).
Launch a visual AI builder in 5 minutes. Connect Langflow to Regolo’s OpenAI-compatible API to build agents with zero code glue and full data sovereignty.
Outcome
- No-Code Speed, Code-Level Power: Drag-and-drop 100+ components (RAG, Agents, Prompts) while keeping the ability to export as Python code later.
- European Inference: Run high-end models like gpt-oss-120b or Llama-3 on Regolo’s EU infrastructure, ensuring your prototype is GDPR-aligned from day one.
- Zero Integration Overhead: Regolo is 100% OpenAI-compatible. Just change the Base URL, and every Langflow “OpenAI” node works instantly.
Prerequisites (Fast)
- Regolo API Key: From your dashboard.
- Docker (Recommended) or Python/uv installed.
- Base URL: https://api.regolo.ai/v1
Step-by-Step (Code Blocks)
1) Install & Run Langflow (Docker)
The cleanest way to run Langflow is via Docker to avoid Python dependency hell.
docker run -d -p 7860:7860 langflowai/langflow:latestCode language: Bash (bash)Alternatively, with python/uv:
uv pip install langflow && uv run langflow runCode language: Bash (bash)Expected output: Access the UI at http://localhost:7860
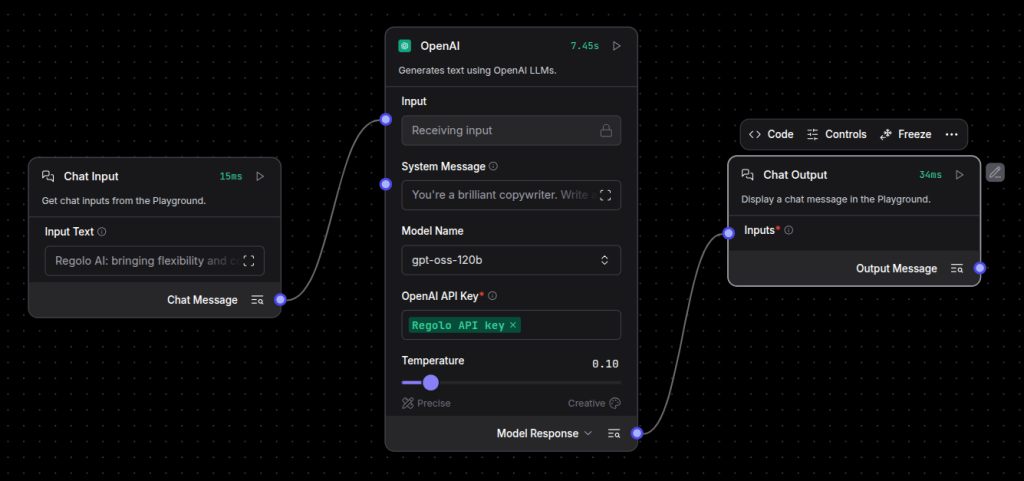
2) Create a Basic Flow
- Click “New Flow” -> “Empty Flow”.
- Drag three components from the sidebar:
- Inputs -> Chat Input
- Models -> OpenAI (Yes, we use this generic node!)
- Outputs -> Chat Output
- Connect them: Chat Input -> OpenAI -> Chat Output.
3) Point the “OpenAI” Node to Regolo
This is the magic step. You don’t need a special plugin.
Open the settings of the OpenAI node and configure:
- OpenAI API Base: https://api.regolo.ai/v1
- OpenAI API Key: YOUR_REGOLO_KEY
- Model Name: gpt-oss-120b (or any other Regolo model name).
Pro Tip: Set these as global environment variables in Langflow (Settings -> Global Variables) to reuse them across all nodes effortlessly.
OPENAI_API_BASE = https://api.regolo.ai/v1
OPENAI_API_KEY  = <your_key>Code language: JavaScript (javascript)
Expected output: The node status turns green/ready.
4) Add a System Prompt
Control the agent directly in the visual node.
- System Message:
You are an expert solution architect.
Answer concisely and focus on privacy-first architecture.
Expected output: The agent now behaves like an architect, powered by Regolo’s inference.
5) Test & Export
- Click the Lightning Bolt (Run) icon on the Output node.
- Type: “How do I secure a RAG pipeline?”
- Watch the response stream in real-time.
Once satisfied, click “Export” to get the JSON or Python code to run this agent in production without the UI.youtube
Production-Ready: Python Export
Langflow isn’t just a toy; it’s a visual IDE. You can export your flow as a Python script.
from langflow.load import run_flow_from_json

# Run the flow you built visually, but programmatically
results = run_flow_from_json(flow="MyRegoloAgent.json", input_value="Hello World")
print(results[0].outputs[0].results["text"])Code language: Python (python)
Expected output: Your visual agent running inside your production backend/API.
Benchmarks & Costs
| Feature | Regolo (via Langflow) | Proprietary Builders |
| Model Choice | Open (gpt-oss-120b, Llama, Mistral) | Locked to vendor models (usually) |
| Data Privacy | European Inference (GDPR) | Often US-only processing |
| Cost | Pay-per-token (Standard API) | Platform fees + markup |
| Lock-in | Zero. Export to Python code. | High. Logic lives in their DB. |
Resources & Community
Official Documentation:
- Regolo Platform – European LLM provider, Zero Data-Retention and 100% Green
Related Guides:
Join the Community:
- Regolo Discord – Share your automation builds
- CheshireCat GitHub – Contribute plugins
- Follow Us on X @regolo_ai – Show your integrations!
- Open discussion on our Subreddit Community
🚀 Ready to Deploy?
Get Free Regolo Credits →
Built with ❤️ by the Regolo team. Questions? support@regolo.ai