Building a custom AI chatbot usually requires a mess of Python scripts, API keys, and vector database management. Non-developers are locked out, and even developers waste hours setting up boilerplate just to “talk” to their own PDFs.
Worse, standard no-code tools often force you to upload sensitive docs to US servers, creating a privacy nightmare for European businesses.
Launch a fully private, GDPR-aligned documentation chatbot in under 10 minutes. Visual drag-and-drop builder (Flowise) + European inference (Regolo) = Zero code, zero data leaks.
Outcome
- Visual Simplicity: Connect nodes like Lego blocks (Document Loader -> Embedder -> LLM) to build complex agents without writing a single line of code.
- Data Sovereignty: By using Regolo as the LLM and Embedding provider, your document vectors and chat queries stay strictly within EU infrastructure.
- Instant Deployment: Flowise generates a ready-to-use chat widget or API endpoint for your website instantly—no frontend development needed.
Prerequisites (Fast)
- Regolo API Key: From your dashboard.
- Docker: To run Flowise locally.
- Documents: A URL or file to chat with (e.g., your company docs)
Step-by-Step (Code Blocks)
1) Install Flowise (Docker)
Get the visual builder running on your machine.
git clone git@github.com:FlowiseAI/Flowise.git
cd Flowise
docker build --no-cache -t flowise .
docker run -d --name flowise -p 3000:3000 flowiseCode language: Bash (bash)
Expected output: Access the Flowise UI at http://localhost:3000
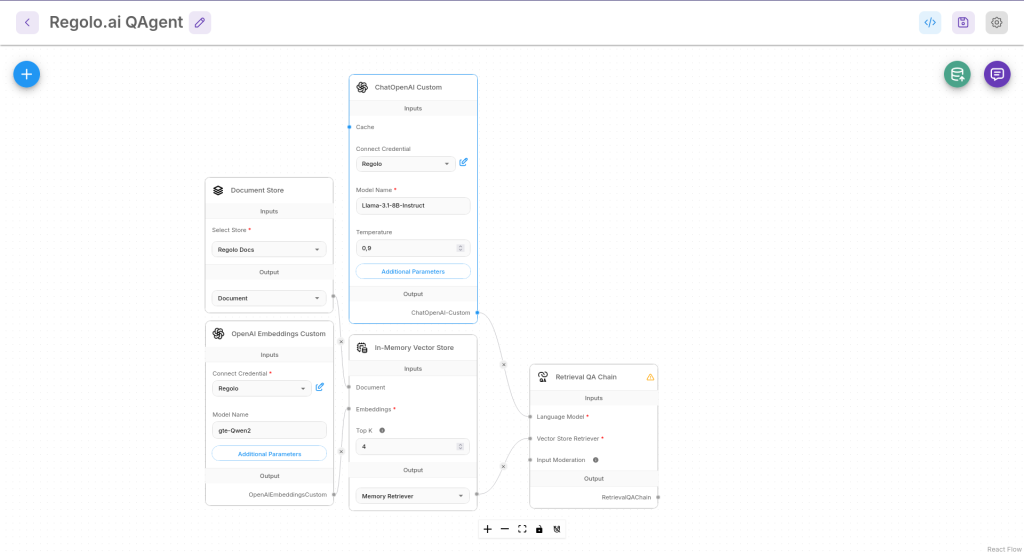
2) Create the Document Pipeline
We need to load your docs and turn them into vectors.
- Node 1: Cheerio Web Scraper (or File Loader). Paste your URL.
- Node 2: Recursive Character Text Splitter (chunk size: 1000).
- Node 3: OpenAI Embeddings Custom (This is the trick!).
- Base URL: https://api.regolo.ai/v1
- Model Name: gte-Qwen2 (High-performance European embedding)
- API Key: YOUR_REGOLO_KEY
3) Create the Chat Pipeline
Now connect the “Brain” to the vectors.
- Node 4: Chat OpenAI Custom (The reasoning engine).
- Base URL: https://api.regolo.ai/v1
- Model Name: Llama-3.1-8B-Instruct (or gpt-oss-120b).
- API Key: YOUR_REGOLO_KEY.
- Node 5: In-Memory Vector Store (or Pinecone for production).
- Connect Document to the Loader.
- Connect Embeddings to the Regolo Embedder.
- Node 6: Conversational Retrieval QA Chain.
- Connect Chat Model -> Node 4.
- Connect Vector Store -> Node 5.
4) “Upsert” Your Data
Save the flow. You’ll see a database icon (Upsert). Click it.
Flowise will scrape your URL, chunk the text, send it to Regolo for embedding (gte-Qwen2), and store the vectors locally.
5) Chat with Your Docs
Click the Chat bubble in Flowise.
Query: “How do I configure the API?”
Expected output: The chatbot retrieves the relevant chunk from your docs and answers using Llama-3, citing the source.
Production-Ready: Embed Widget
Don’t just keep it in Flowise. Add it to your app.
- Click the </> (Embed) icon in Flowise.
- Copy the script tag.
- Paste it into your website’s <body>.
<script type="module">
    import Chatbot from "https://cdn.jsdelivr.net/npm/flowise-embed/dist/web.js"
    Chatbot.init({
        chatflowid: "YOUR_FLOW_ID",
        apiHost: "http://localhost:3000",
    })
</script>Code language: HTML, XML (xml)
Expected output: A floating chat bubble on your site powered by Regolo.
Benchmarks & Costs
| Feature | Regolo (via Flowise) | Proprietary Chatbots (Chatbase etc) |
| Data Privacy | High (EU Inference). | Low. Docs often stored in US. |
| Model Choice | Open (Llama/Qwen/Mistral). | Locked to GPT-3.5/4 usually. |
| Cost | Pay-per-token (~€0.01 queries). | Monthly sub (€20-100/mo). |
| Customization | Full. Edit prompt, temperature, RAG. | Limited black box. |
👉Start Building Visually
Resources & Community
Official Documentation:
- Flowise AI – Flowise AI website
- Regolo Platform – European LLM provider, Zero Data-Retention and 100% Green
Related Guides:
Join the Community:
Open discussion on our Subreddit Community
Regolo Discord – Share your automation builds
CheshireCat GitHub – Contribute plugins
Follow Us on X @regolo_ai – Show your integrations!
🚀 Ready to Deploy?
Get Free Regolo Credits →
Built with ❤️ by the Regolo team. Questions? support@regolo.ai